

The Allocator allows for the redistribution of positions across various accounts. When positions are redistributed, their average price can be manipulated (within certain limitations) and commission rates can be set.
Click on the Allocator icon ![]() in the WTP toolbar (under Manage).
in the WTP toolbar (under Manage).
Alternate Method:
From the WTP menu, select Allocator.
Allocator can display Cmta accounts or Omni accounts (see note below). Each account type is defined by WEX during WTP installation.
The drop-down list contains the following selections:
<All>
(displays both Cmta and Omni accounts)
Cmta
Omni
Report Trade
Select the account type and the account name to view the account positions from which allocations can be made.
Note: Cmta, Omni, or Report Trade mode is accessible only if the Global Configuration option Exclude Report Trades from Allocation is checked. If unchecked, no selection is possible and Allocator defaults to <All> display.
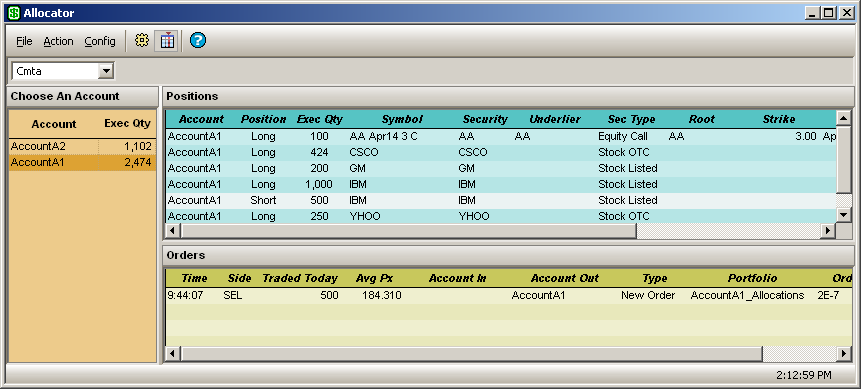
The Allocator window is divided into three sections when <All>, Cmta, or Omni is selected:
List of Accounts (left grid)—The
accounts to which an allocation can be made to or from.
Positions Grid (top)—The
buys and sells based on the selected account.
Orders Grid (bottom)—The product/account/side information of the selected position. Allocations made will also be listed.
The Allocator window is divided into two sections when <Report Trade> is selected:
List of Accounts (left grid)—The
accounts to which an allocation can be made to or from.
Order Grid—The Order grid shows all Option Report Trades, regardless of Cmtas.
An allocation is accomplished when selected position(s) of one or more accounts are defined to be allocated to one or more accounts.
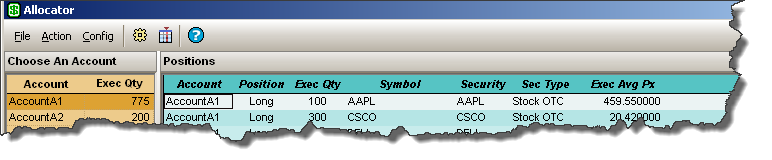
Step 1: In the example below, a position is selected. Account = AccountA1, Symbol = AAPL, Executed Quantity = 100
Step 2: Right click (or double-click) on the position row for the position that is to be allocated and select Add Allocation (or select Action-->Add Allocation).
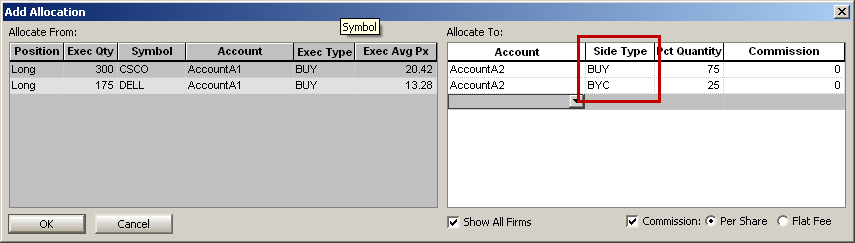
The Add Allocation window displays:
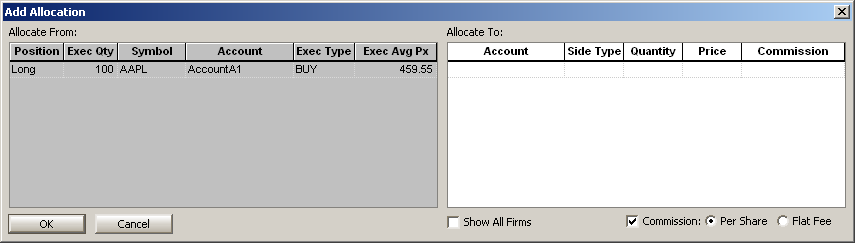
The Allocate From portion of the window displays the position data selected.
Step 3: In the Allocate To section of the Add Allocation window, select an account from the drop-down list in the Account column. Once selected, the quantity, and price will display.
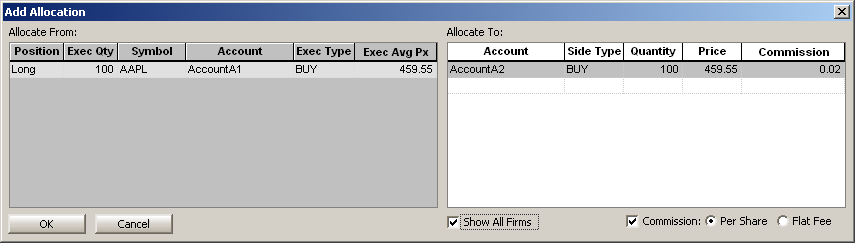
If a commission is to be attached to the allocated account, check the Commission box and select either Per Share or Flat Fee. If the commission value is empty, zero, or greater than $0.05, an Allocation warning message will be issued. Allocations can be successfully completed despite the warning messages. Click Yes on the warning message to allow the allocation to complete. When Commission is unchecked, the Commission column will not be displayed, resulting in the same interpretation as an empty commission value.
In the example, the AAPL position will be allocated to the AccountA2 account with a commission of $0.02:
Note 1: If an entire position is being allocated the average price cannot be modified.
Note 2: If allocating from a position in which all orders are identical (in this example Long), you may select the side type of <Auto>. The Allocate-To account's side type will automatically match that of the Allocate-From account.
If the Allocate-From account has various positions, then the <Auto> side type will be unavailable for selection.
Step 4: Click OK to allow the allocation to commence, or Cancel to exit without an allocation.
Once the allocation has transpired, the account that received the allocation will be updated.
In the example below,
the account (AccountA2) now
shows its position as having the allocated Symbol (AAPL),
and the Order section of the Allocator gird notes that an Allocate
In transaction has occurred:
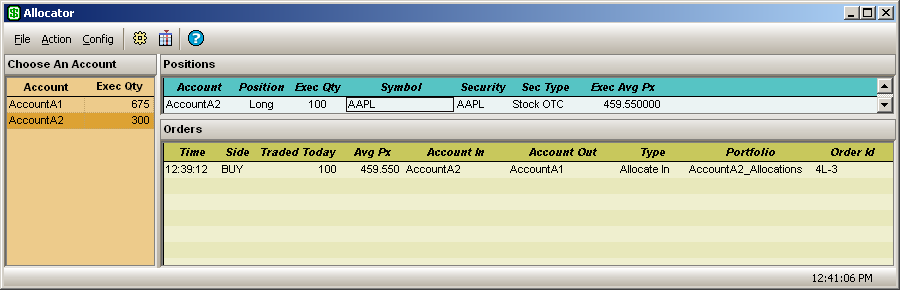
The column labeled Type in the Orders grid shows that this order was Allocate In confirming a successful allocation took place.
Multiple Allocations From a Single Side
In the example above, one account's position was allocated to one account.
A single position can be allocated to multiple accounts. Note: The quantity sum from all accounts cannot exceed the quantity of the Allocate From position.
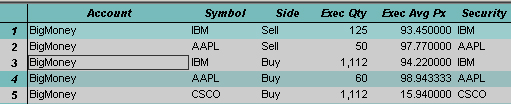
Multiple Allocations from Multiple Sides
Multiple sides can be selected for allocation to one or more accounts.
In the example below,
three sides for three symbols have been selected for allocation:
The Add Allocation window looks similar to the single allocation, except that percentages must be defined in order for the allocation to commence.
In this example, 20%,
60% and 10% were defined as allocation percentages to three accounts.

Note: The Pct. Quanity cannot exceed a total of 100%, though it can be less. Any allocation totaling less than 100% leaves the remaining percentage in the originating account.
Side types will be provided based on whether the orders being allocated are Options or Non-Options. If allocating Options and Non-Options together side types cannot be selected.
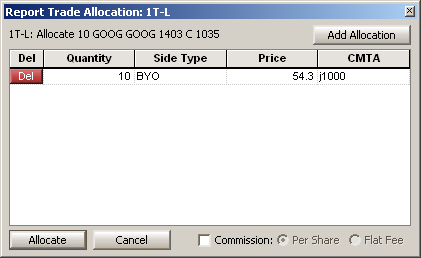
Create/Change Cmta Values from the Report Trades Grid
Although Report Trades cannot be allocated per se, a Report Trade can have a Cmta value added or changed. Double-click on a specific order (or right-click on the order and select Add Allocation). When selected, the Report Trade Allocation window launches. The Cmta value can be edited in this window:
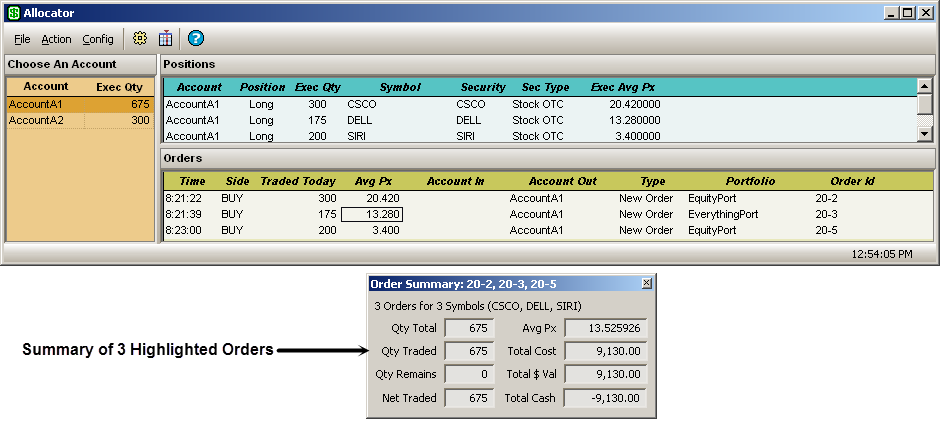
The Order Summary window in Allocator displays:
Quantity total
Quantity traded
Remaining quantity
Total net traded
Average price
Total cost
Total value
Total Cash
Launch the Order Summary window:
Alternate Method:
From the Action menu, select Show Order Summary.
The Order Summary window is also available in the Order Grid and is accessible by right-clicking on selected orders or via the Action menu.
Select an
order in the Orders portion
of Allocator
Right-click
and select Show Order Detail.
Alternate Method:
From the Action menu, select Show Order Detail.
See the Order Grid page for more details on the Show Order Detail feature.
Columns relating to Options including Underlier, Root, Strike, and Expiration Date can be added to Allocator.
Note: If it's preferred to always display the Options columns, the Allocator can be saved as a template. When the template is retrieved, the Options columns will be visible.
See Export Grid Data for more information on how data can be exported to files, the clipboard, or a spreadsheet program.
![]()
© 2015 Wolverine Execution Services, LLC