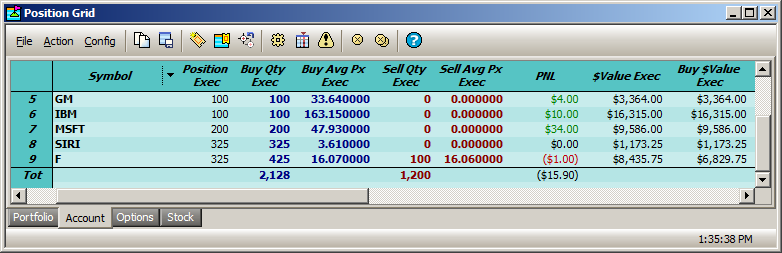
Position Grid allows you to view accumulated positions by portfolio, account or firm.
From the WTP toolbar select Manage-->Position Grid.
Alternate Method:
From the WTP menu select Position Grid.
Open The Configure Window
Open
the Configure window by clicking on the configuration button ![]() .
.
Alternate Methods
From
the Config menu select Configuration
Right-click the mouse anywhere in the grid and select Configuration
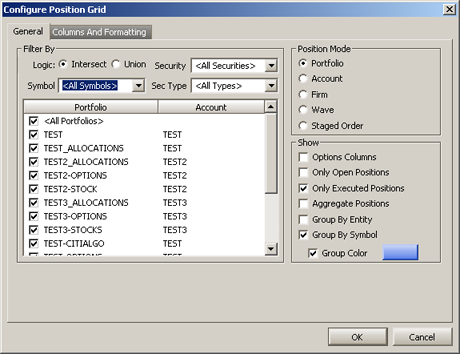
Position Mode
The Position Grid can be configured to report on each type of position collection.
When a Position Mode is selected, additional options are available to customize the reporting:
Portfolio—check the desired
portfolio(s), or <All Portfolios>
Account—check the desired
account(s), or <All Accounts>
Firm—check the desired firm(s),
or <All Firms>
Wave—check the desired wave(s), or <All Waves>
Filter
By
The data displayed in Position Grid is filtered by one of two selectable
methods:
Intersect—Position
Grid will display all orders that match the Security Name, Security
Type, User, Side, etc., i.e., orders that match all of the selected filters.
Union—Position Grid will display all orders that match the Security Name or Security Type, or User, or Side, etc., i.e., orders that match any of the selected filters.
Security and Sec Type
From the drop-down lists select one or more securities and security types.
Select <All Securities> and <All Types> to quickly choose all securities and types.
Show Display Options
Check the box next to the following view options in Position Grid:
Options Columns—Strike,
expiration date, and other options-related columns
Only Open Positions—Stocks or equities that are owned
Only Executed Positions—Executed position data
Aggregate Positions—Adds rows to display the cumulative
position of a portfolio/account/firm/ or wave. Three asterisks
(***) will be displayed in the Symbol column
for each portfolio.
Position Summaries—Grouped
either by Entity (i.e.,
account names) or Symbol
Group By Entity—In the
Portfolio column, a button
for each portfolio will be listed. The PNL column will display
the total profit/loss for each portfolio.
Group By Symbol—In the
Symbol column, a button for
each symbol will be listed. The PNL column will displays the profit/loss
for each symbol.
Group Color—Either position
summary rows can be displayed in any desired color. Press the
rectangular color box to open a color window. Select an existing
color or define a custom color.
Columns and Formatting
Learn how to set up columns and define formatting here.
Configure Position Grid to Display Underlier Quote Data
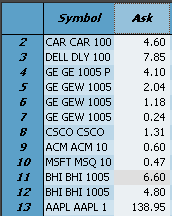
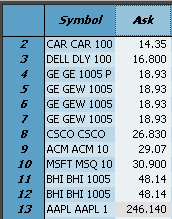
Ask column displaying Option quotes |
Ask column displaying underlier quote data |
The Position Grid can be configured to display underlier quote data (bid/ask/last/vol) instead of, or in conjunction with, Option data.
There are two different methods for displaying underlier values:
Method 1: Set Column Style for the Quote column
Right-click
on the header of the column and select Set
Column Style.
Check
the box Use Alternate Display.
In the image below, the "Ask" column is configured to
display underlier data.
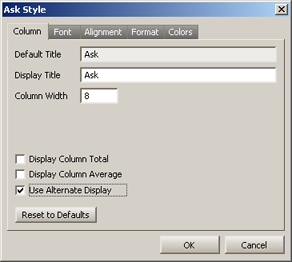
Press OK to close the style window.
Method 2: Create a User Defined "Numeric Expression" Column
With this method, a user defined column is created and an expression is entered that will display the underlier quote data.
The benefit of this method is that an underlier data column can exist in the same grid as the Option data.
Open
the configuration
window from the Position Grid.
Select
the Columns and Formatting
tab.
Select
User Defined Fields.
Double-click
on <Numeric Expression>
to add it to the visible columns (or select <Numeric
Expression> and press the right arrow).
In
the Visible Columns
section, double-click on <Numeric
Expression> (or select <Numeric
Expression> and press Set
Column Style). The <Numeric
Expression> style window will open.
Enter
a display title and expression. The title should reflect the type
of quote data to be displayed.
The expression is entered in the following format:
[Alt: name
of quote data column]
In the example below the Ask
quote data column is defined in the expression.
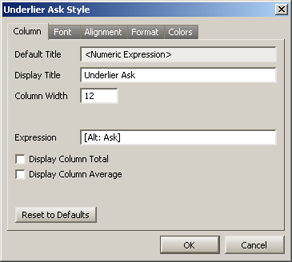
Press OK to close the column style window and add the new column to the Position Grid.
An adjustment can be made to any position via a special Order Ticket.
Note: Position adjustments can be executed by those with the proper client permission.
To adjust a position:
Press the Adjust Position button ![]()
Alternate Methods:
From the Action
menu, select Adjust Position.
Right-click in the Position Grid and select Adjust Position.
Note: If a row in the Position Grid is highlighted prior to selecting Adjust Position, its symbol will automatically be placed in the Adjust Position Ticket.
An ALERT column can be added to the Position Grid. When activated, the Alert column will display the button Alert next to each symbol in the grid.
Press the Alert Columns button
 to display the Alert button and the Enable check box.
Alternate Methods:
From the Config
menu, select Show Alert Columns.
Right-click in the Position Grid and select Show Alert Columns.
Alert Button Colors
The Alert button will change colors reflecting the status of the button's underlying settings. The display colors of the Alert button are:
green—The
Alert button is active
yellow—The Alert button is inactive
red—The
criteria for the Alert button has been met
The Enable
check box column (next
to the Alert button) turns the Alert for the its row on and off.
See Set Row Color Conditions for instructions in using the configuration window.
Cancel Position Orders, Cancel All Orders, Cancel Matching Orders
Live orders can be canceled in Position Grid, either selectively or completely.
Cancel Position Orders
Highlight
the row containing the position to be canceled by clicking on
it.
Press the Cancel Position Order
button  .
.
Alternate Methods:
Right-click
on the row containing the position to be canceled and select Cxl Selected Position Orders.
From the Action menu select Cxl Selected Position Orders.
Cancel All Orders
Press
the Cancel All Orders button  .
.
Alternate Methods:
Right-click
anywhere in the grid area and select Cancel All Orders.
From the Action menu select Cancel All Orders.
Cancel Matching Orders
All orders for a specific symbol, or all orders in an account or portfolio can be canceled.
Right-click
on a row whose order is to be deleted.
Select
Cancel Matching Orders -->
and one of the following:
Cancel All For Symbol ___
In Account ___
In Portfolio ___
Alternate Method:
Click on the row whose order is to be deleted.
From the Action column
select Cancel Matching Orders
continue with step #2 above.
The Order
Grid is launched whenever a
row in the Position Grid is double-clicked. The Order Grid opens with
the selected position.
Alternate Methods:
Select a row
in the Position Grid and click on the Order Grid button
![]() .
.
Right-click
on a row in the Position Grid and select Send To -->
Order Grid.
Select a row in the Position Grid and from the Action menu select Send To --> Order Grid.
Data in the Position Grid can be exported to a file, clipboard, or Excel spreadsheet.
Learn about exporting grid data here.
The Copy command copies all the symbol names in the Position Grid. The Copy This Cell command copies a selected cell.
To Copy:
Select
one or more rows.
From
the Action column
select Copy.
Alternate Methods:
Right-click on the highlighted rows
and select Copy.
Press Ctrl +c after highlighting
the row(s).
Press the copy button ![]() after highlighting
the row(s).
after highlighting
the row(s).
To Copy a Cell:
Click
on the cell to be copied.
From
the Action menu,
select Copy This Cell.
Alternate Methods:
Right-click
on the cell to be copied, and select Copy
This Cell.
Click on the cell to be copied and type Ctrl +c.
![]()
© 2015 Wolverine Execution Services, LLC