

 Option
Time and Sales
Option
Time and Sales
Option Time and Sale allows you to view tick-by-tick details for all option products for a given security over a defined period. Optional views include detailed information about a selected product and summary data.
From the WTP Toolbar select Analyze-->Option Time and Sales.
Alternate Method:
From the WTP menu select Option Time and Sales.
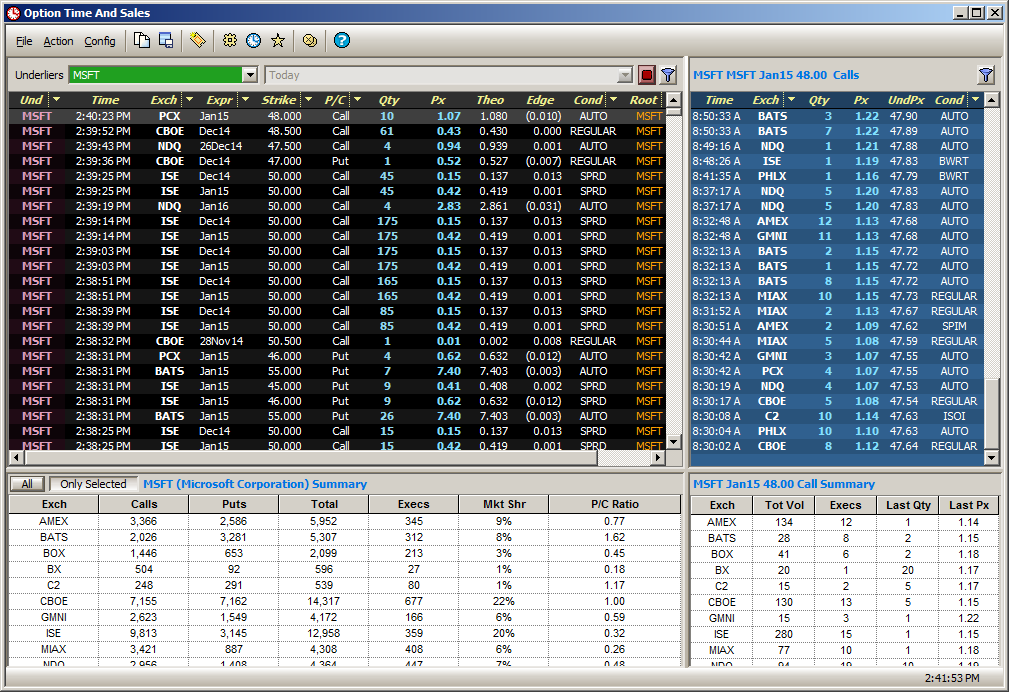
The Option Time and Sales Window
The Option Time and Sales window can be divided in quadrants, depending on viewing preferences. In the image above, the four quadrants are defined as follows:
Upper
Left—Primary Display Define the reporting time,
start/stop data retrieval, and/or filtering parameters.
Upper
Right—Detailed Grid Displays all the ticks for
a currently selected product in the primary display grid.
Bottom
Left—Summary Grid Displays the summary for a
selected underlier OR displays the total data for all underliers.
Bottom Right—Detailed Summary Grid Displays a summary of the currently selected product.
To enter one or more underliers, the
Option Time and Sales window must be stopped. Press
the red Stop button  . The Underliers window will
now be available for input.
. The Underliers window will
now be available for input.
Enter one
or more stock symbols. Separate each symbol with a comma or semi-colon.
Select a
reporting time (see below).
Press the
green Go button
 .
.
The Option Time and Sales window will retrieve relevant underlier data.
Option Time and Sales can retrieve market data based on selected time parameters.
Today
(all ticks from midnight of the current day)
Yesterday (all ticks up until
midnight of the previous day)
Custom (tick data retrieved between
the two defined time/date settings). When selected, the Time Span window launches:
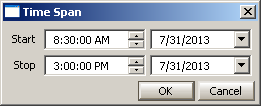
Enter the start/stop times (or use the up/down spinner arrows),
and select a date from the drop-down list.
Note: Option Time and Sales must be stopped in order to enter reporting time values.
Select a Tick for a Detailed View
Click on any tick in the Primary Display to view detailed information about the underlier. The data will be displayed in the Detailed Grid.
If the Detailed Grid is not displayed, it must be activated. See Configure Option Time and Sales for instructions on how to display the Detailed Grid.
Note: Although many underliers may be reported, only one underlier at a time can have its detailed information displayed in the Detailed Grid.
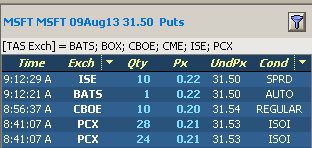
Filter Details
Press
the filter button  to open the Detail
Filters window where filters are defined. In the image
above, a filter was defined to display ticks from six different exchanges.
to open the Detail
Filters window where filters are defined. In the image
above, a filter was defined to display ticks from six different exchanges.
The Detail Filters window is similar to the set row color conditions window. Learn how to configure this window here.
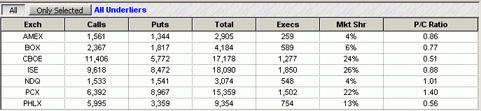
Summary Grid All mode
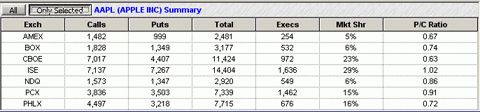
Summary Grid Only Selected mode
The Summary Grid displays either a summary of all underliers (if more than one underlier has been entered in the Underliers field), or a summary of a single underlier (selected in the primary display).
Select the preferred summary by pressing the All or Only Selected button.
The Summary Grid can be enabled/disabled, by making the appropriate selection in the configuration window.
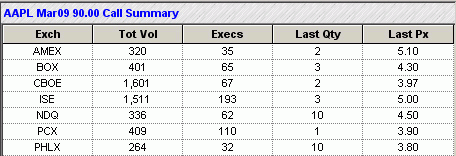
The Detail Summary Grid (bottom right) displays a summary of a selected product.
To populate the Detail Summary Grid, click on a underlier tick in the Primary display.
The Detail Summary Grid can be enabled/disabled, by making the appropriate selection in the configuration window.
The data displayed in the Primary display can be filtered. When a filter is in force, only data that matches the parameters of the filter will be displayed.
For example, if it desired to view the underliers from a specific exchange, a filter can be defined to show only the exchange name.
Define a Data Filter
Press the
filter button The Filters input screen displays:
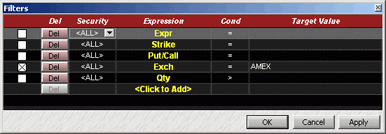
Define a
security, expression, condition, and target value and press OK or Apply.
For more information about defining expressions see Set
Row Color Conditions.
When a filter is active,
the filter expression and target value will be displayed in the Option
Time and Sales window. The image below reflects the filter selection
of displaying data from AMEX exclusively:

The Option Time and Sales window can be configured to display data in consolidated mode where each line corresponds to a separate product.
In consolidated mode only the cumulative fields are shown per each tick.
Set Option Time and Sales to Consolidated Mode
Right-click the mouse anywhere in the Option Time and Sales window and select Consolidated Mode.
Alternate Methods:
From the Config menu
select Consolidated Mode.
From the configuration window, Miscellaneous tab, check Consolidated Mode.
Disable Consolidated Mode by repeating the same procedure.
The Primary Display can be configured for Split Grid Mode, where calls and puts are on separate grids. In the image below Split Grid Mode is enabled:
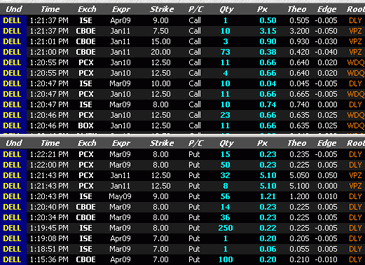
Enable Split Grid Mode:
Right-click the mouse anywhere in the Option Time and Sales window and select Split Grid Mode.
Alternate Methods:
From the Config menu
select Split Grid Mode.
From the Configuration window, miscellaneous tab, check Split Call/Put Grids.
Disable Split Grid Mode by repeating the same procedure.
Option Time and Sales can be changed to Equity Time and Sales with a simple command.
Click
on the Equity Time and Sales button ![]() or right-click
the mouse anywhere in the Option Time and Sales window and select
Switch to Equity Mode.
or right-click
the mouse anywhere in the Option Time and Sales window and select
Switch to Equity Mode.
Configure Option Time and Sales
Grid styles, color conditions, header styles and other features can be configured through the Configuration window.
View the Configuration
Dialogue
Select the configuration button ![]() .
.
Alternate Methods:
Right-click
the mouse anywhere in the Option Time and Sales window and select
Configuration
From the Config menu, Configuration
Configure Grids
The first four tabs in the Configuration window are used for defining grid styles, row color conditions, and column header styles for the following:
Time
and Sales Grid
Call
Grid
Put
Grid
Detail Grid
To learn more about grid setup see Columns and Formatting.
Note: Option Time and Sales must be in Split Grid Mode in order to configure the Call Grid and Put Grid configuration screens.
Issue/Cancel Orders from Option Time and Sales
A new order can be initiated from Option Time and Sales. The Order Ticket will appear.
Open (unfilled) orders can also be canceled, either collectively, or individually by symbol
Issue an order
Right-click in the Option Time and Sales window and select Order Ticket.
Alternate Methods:
From
the Action menu select
Order Ticket
Type Ctrl +n
Cancel all open orders
Right-click in the Option Time and Sales window and select Cancel All Orders
Alternate Method:
From the Action menu select Cancel All Orders
Cancel all open orders for a specific symbol
Right-click in the Option Time and Sales window and select Cancel All For Symbol: xxx (where xxx is the symbol name)
Alternate Methods:
From
the Action menu
Cancel All For Symbol: xxx
Type Ctrl +z
Grid data in Option Time and Sales can be exported to a file, clipboard, or Microsoft Excel spreadsheet.
Learn more about exporting grid data here.
Templates for Option Time and Sales can be opened, saved, or saved as a default. If all the characteristics of the Option Time and Sales display are desirable, saving the display as a template saves all previously defined parameters.
Option Time and Sales templates are saved with a .tas extension.
Learn more about templates and how they're used in WTP here.
The following codes can be found in the Cond column. This column is present in the default template of Option Time and Sales.
Value |
Description
|
| REGULAR | Indicates that the transaction was a regular sale and was made without stated conditions. |
| CANC | Transaction previously reported (other than as the last or opening report for the particular option contract) is now to be canceled. |
| OSEQ | Transaction is being reported late and is out of sequence; i.e., later transactions have been reported for the particular option contract. |
| CNCL | Transaction is the last reported for the particular option contract and is now canceled. |
| LATE | Transaction is being reported late, but is in the correct sequence; i.e., no later transactions have been reported for the particular option contract. |
| CNCO | Transaction was the first one (opening) reported this day for the particular option contract. Although later transactions have been reported, this transaction is now to be cancelled. |
| OPEN | Transaction is a late report of the opening trade and is out of sequence; i.e., other transactions have been reported for the particular option contract. |
| CNOL | Transaction was the only one reported this day for the particular option contract and is now to be canceled. |
| OPNL | Transaction is a late report of the opening trade, but is in the correct sequence; i.e., no other transactions have been reported for the particular option contract. |
| AUTO | Transaction was executed electronically. Prefix appears solely for information; process as a regular transaction. |
| REOP | Transaction is a reopening of an option contract in which trading has been previously halted. Prefix appears solely for information; process as a regular transaction. |
| AJST | Transaction is an option contract for which the terms have been adjusted to reflect a stock dividend, stock split, or similar event. Prefix appears solely for information; process as a regular transaction. |
| SPRD | Transaction represents a trade in two options in the same class (a buy and a sell in the same class). Prefix appears solely for information; process as a regular transaction. |
| STDL | Transaction represents a trade in two options in the same class (a buy and a sell in a put and a call). Prefix appears solely for information; process as a regular transaction. |
| STPD | Transaction is the execution of a sale at a price agreed upon by the floor personnel involved, where a condition of the trade is that it reported following a non-stopped trade of the same series at the same price. |
| CSTP | Cancel stopped transaction. |
| BWRT | Transaction represents the option portion of an order involving a single option leg (buy or sell of a call or put) and stock. Prefix appears solely for information: process as a regular transaction. |
| CMBO | Transaction represents the buying of a call and the selling of a put for the same underlying stock or index. Prefix appears solely for information; process as a regular transaction. |
| SPIM | Transaction was the execution of an order which was “stopped” at a price that did not constitute a Trade-Through on another market at the time of the stop. Process like a normal transaction except don’t update “last”. |
| ISOI | Transaction was the execution of an order identified as an Intermarket Sweep Order. Process like normal transaction. |
| BNMT | Transaction reflects the execution of a “benchmark trade”. A “Benchmark Trade” is a trade resulting from the matching of “Benchmark Orders”. A “Benchmark Order” is an order for which the price is not based, directly or indirectly, on the quote price of the option at the time of the order’s execution and for which the material terms were not reasonably determinable at the time a commitment to trade the order was made. Process like a normal transaction except don’t update “last”. |
| XMPT | Transaction is Trade Through Exempt. The transaction should be treated like a regular sale. |
![]()
© 2015 Wolverine Execution Services, LLC